Plan a website migration
Moving a website to a new host is safest when you copy everything first, test the copy privately, and only then switch DNS. This checklist walks through each stage so visitors and email are not interrupted along the way.
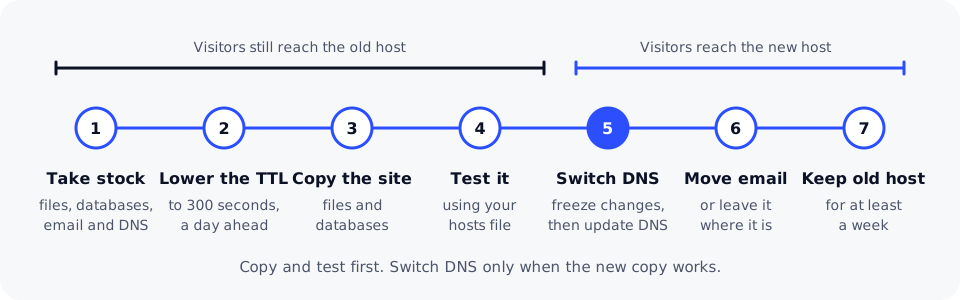
1. Take stock of what you have
List everything the site depends on before you start. Things that are easy to forget:
- Files: the website itself, uploads and media, plus configuration files such as
.htaccess. - Databases: their names, users and the settings file that connects the site to them.
- Email: mailboxes, forwarders and the DNS records that make email work (MX, SPF, DKIM, DMARC).
- DNS records: a full copy of every record, including subdomains and verification TXT records.
- Scheduled tasks (cron jobs), redirects, and the software versions the site needs, such as the PHP version.
- SSL: whether the new host will issue a certificate for you, and when.
2. Lower the DNS TTL in advance
At least a day before the move, lower the TTL of the records you will change (usually the A, AAAA and www records) to 300 seconds. This lets the final switch reach visitors within minutes. Why DNS changes take time explains why.
3. Copy the site to the new host
- Take a full backup at the old host: files and every database. Keep a copy on your own computer too.
- Upload the files to the new host and import the databases.
- Update the site's configuration with the new database name, user and password.
- Recreate scheduled tasks, redirects and any settings the site needs, such as the PHP version.
4. Test before you switch
You can view the new copy under your real domain before DNS changes by telling only your own computer where it lives. Add a line to your computer's hosts file with the new server's IP address:
203.0.113.20 example.com www.example.com
The hosts file is at C:\Windows\System32\drivers\etc\hosts on Windows (edit it as administrator) and /etc/hosts on macOS and Linux.
Then browse the site and check pages, forms, logins, search, checkout and anything else visitors use. Your browser may warn about the certificate if the new host has not issued one for your domain yet; that is expected at this stage.
Delete the line from your hosts file once testing is done. If you forget, your computer keeps going to that address even after the move, which can hide problems other visitors see.
5. Freeze changes and switch
- Pause changes on the old site, such as new posts, orders or comments, or take a last backup just before you switch so nothing is lost.
- If the site's content changed since you copied it, copy the latest database and uploads again.
- Update the DNS records to the new host's addresses, or change the nameservers if you are moving DNS too.
- Check the live DNS answer, then open the site from a phone on mobile data to see what a new visitor sees.
- Make sure an SSL certificate is active on the new host and that
http://redirects tohttps://.
6. Move email separately, or leave it where it is
Your website and your email can move at different times. If email stays with its current provider, leave its MX and TXT records exactly as they are.
If email is moving too, create the mailboxes at the new provider first, copy existing messages (many providers have an import tool that copies mail over IMAP), and then change the MX records. Ask people to keep their old mailbox settings until the new ones are confirmed to work.
7. Keep the old host for a while
Don't cancel the old hosting straight away. Keep it for at least a week so you have a working copy to fall back on and time to spot anything that was missed. Raise the DNS TTL back to its usual value once everything works.
DomainPilot web hosting includes a free website migration: the team moves your site and files from your current host. To ask for one, use the migration request form.